Friday, November 30, 2012

Bathroom Refresh

 I decided that it was time to move things around a little in the bathroom. You know how you want to make a change but you are not sure what to do. That was me. So, I painted the wall from yellow to white. You can see the old bathroom from the past blogs.
http://1frugalqueen.blogspot.com/2009/11/when-we-first-started-bathroom-it-only.html

 
I took these two old picture frames, painted them to look old with primer and gesso. They turn out looking beautifully old.
 
 
I Love to Love
 
 
I had my husband to cut the board, I painted it, scratched it up a bit, bought some hooks and hung this one over the tub.
 
 
This is the other one. The rack that I had here was an old one from when we moved in the house. We could not hang anything on it since it would not stay in the wall. These board are a lot stronger. It made the bathroom feel like a little spa.
 
 
The frame says I Love You in French.
 
 
I stenciled the corners of the boards.


I had this heart in a box for years. Then I decided to add paint to it. You can see a little of the red from the original paint I added years ago. I transferred the picture with matt gel. I purposely banged it up a little to make it look worn.
 
 
I added these two angels from old Christmas ornaments.
 
 
I made this flower holder, added flowers from the $1 store.
 
 
I had these two pieces in a drawer. They can from broken wind chimes.
They rusted from being outside.
 Perfectly rusted!


I made the reef from an old book that was sitting in a box in the basement.
Yes, it was a romance novel.
 
 
Feels Romantic! Maybe it was the book:)
 
 
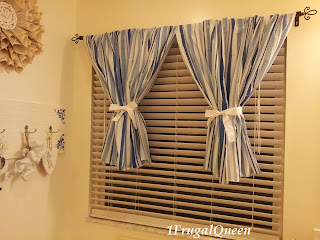
The window treatment are two shower curtains from the $1 store.
$1 each. I then tied white ribbon around them.
 
 
Here is another piece of junk from the box in the basement. I painted the square board, roughed it up and then transferred the stencil. I added raffia to hang it. I love roughed up old things.
 
 
I made this topiary out of flowers from the $1 store. I thought it added a little sunshine first thing in the morning.
 
 
A little bit of sun in the middle.
 
 
Dont' be affraid to change things up.
 
 
You might just be surprised on what you get.
 

Monday, November 5, 2012

I Love Fall

Everyone who know me, know that I LOVE FALL! This is my favorite time of the year. I love the fireplace, hot tea, warm desserts and snuggling. Even though I love decorating I still try to be reasonable with how much I spend out of my purse.
 
Over the fireplace I decided to put up one of the art pictures I painted. I painted it on some spare board I had left over from a previous home project. I painted the two pumpkins with gresso. The silver pedestal came from the Goodwill for $2. I found the black urn at the Good will for $3. Then I  cut out some yellow tissue paper for the flower.

I painted these pumpkins that I had for years in a box. Two of the  pumpkins were painted a copper color. I painted one black. The mirror is from the Goodwill, I got it for $2. I painted it with gresso to give it an old world look. The birdhouse church came from a local consignment shop for $10.
 

Doesn't this feel like fall...aahhh the simple things.

The foliage help set the tone for my little design.


I found this beautiful rub off wall letters that I put on the fireplace. It was discounted at a local store for only $5. I grabbed it so fast. It says "Home is everything that makes us feel beautiful, safe and loved"

How sweet is that!

I had to share with you the beautiful butternut squash that came from my garden. I bought the pumpkins and the green gord.

In spite of the hot summer and those pesty ground hogs, these 3 survived.

Then I added a final touch to my feeling of fall. I made a table runner out of drop cloth. I stenciled "Come Gather At Our Table" on both sides of it

This is a close up of the stencil.
 
At the end of the runner I put this W there for our last name.
Feels like fall to me.


Monday, October 22, 2012

It's A Sign

I had these left over wooden plagues and decided to get them out of the closet and do something with them. I got the idea from a DIY program to make these into hanging signs.
 
 
I found the plant hangers from a local home improvement store in the garden center. Since the season is changing, I got the hangers for $3 each. I screwed the little o hooks in at the top. Then I took picture frame wire to wrap around the hangers. From the floor looking up you can barely see the wire and mistakes that I made:)
 
 
I printed the signs from my computer and threw some paint on the edges.
 
 
They turned out really nice.
 
 
This was a quick easy fun project.

Thursday, October 4, 2012

A Bright Idea

 
The microwave in my kitchen went out about three years ago. I found that what I didn't use anymore did not need to be replaced. You see, I got used to heating my food the old fashioned way...on the stove. I was only using it for the light when I cooked and that light was not very bright.
 
So, I had my husband to take the microwave out. I did not have a lot of money to spend so I needed to be creative. I painted the underneath to match everything else.
 
 
So I went out to the garden shed and found two of these baskets that had been sitting there for years. I painted it a pretty white.
 
My husband provided this light fixture and ran the wires.
 

My husband took some short screws that he had in his tool chest and put the two baskets together. This is what it looks like finished and wow! It gives me a whole lotta light!
 

I actually started singing "You LIght Up My Life" to my husband!


It's A Bright Idea!


Monday, September 24, 2012

Drop Cloth Chair Covers

 
I have had these chairs for about seven years and decided to do something with them, but did not have a lot of money to spend. So, I went to Home Depot and spent about$15.00 on drop cloth.
 
 
I measured and the back of these chairs sewed and stenciled the first letter of my last name on the backs.
 
 
I used a permanent black marker instead of paint.
 
You can even turn it around if you want. I like to letter on the back of the chair
 
 
Then I ventured to do these cafe chairs. I used this stencil in the seat.
 
 
It gave the chairs a really nice look.
 
 
I made a cover for these chairs also. I made up "Le Cafe Van Gogh" since that is the name of our street, and numbered the chairs No.1 and No.2, then I drew a vine on the back for a added touch.
 
 
This is the front of the chair.
 
 
Back View
 
 
Be Frugal and Live Like a Queen!